Mounting ISO files in Windows 7 provides a virtual optical drive experience. This allows you to access the contents without burning the file to physical media. Common reasons include:
- Convenience: Quickly access software, operating system installers, or game files.
- Preservation: Avoid wear and tear on physical optical drives and discs.
- Security: Verify software integrity by comparing checksums after mounting.
How to Mount ISO Files (Native Method)
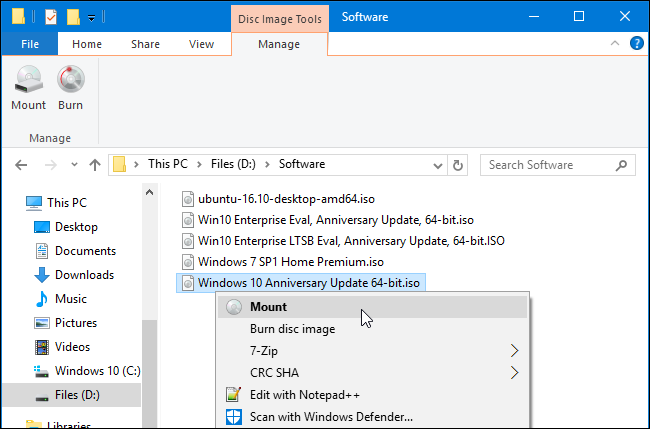
Windows 7 natively supports mounting ISO images (and IMG/VHD files) through File Explorer:
- Locate the ISO File: Browse to the ISO file using Windows Explorer.
- Mount: Right-click the ISO file and select Mount from the context menu.
- Access Content: A new virtual drive letter appears under "Devices and drives" in "Computer". Open it to browse and run files as if a physical disc were inserted.
How to Unmount ISO Files
- File Explorer: Open "Computer". Right-click the virtual drive and select Eject.
- ISO File Context: Right-click the original ISO file and select Eject.
Important Considerations
- Windows Version: Native mounting works in Windows 7 Ultimate, Enterprise, and Professional editions. It is not available in Starter, Home Basic, or Home Premium.
- UDF File System: Windows 7's native tool cannot mount ISO images using the UDF file system (common for some video DVDs and newer discs).
- File Size Limit: Files larger than 4GB require an NTFS formatted drive.
For unsupported editions or formats, use third-party virtual drive software compatible with Windows 7.