Here's a professional guide on quickly compressing videos directly on your iPhone using built-in features and reliable apps:
Reduce Video Size Before Recording (Quickest Method)
Adjust settings before recording to capture smaller files:
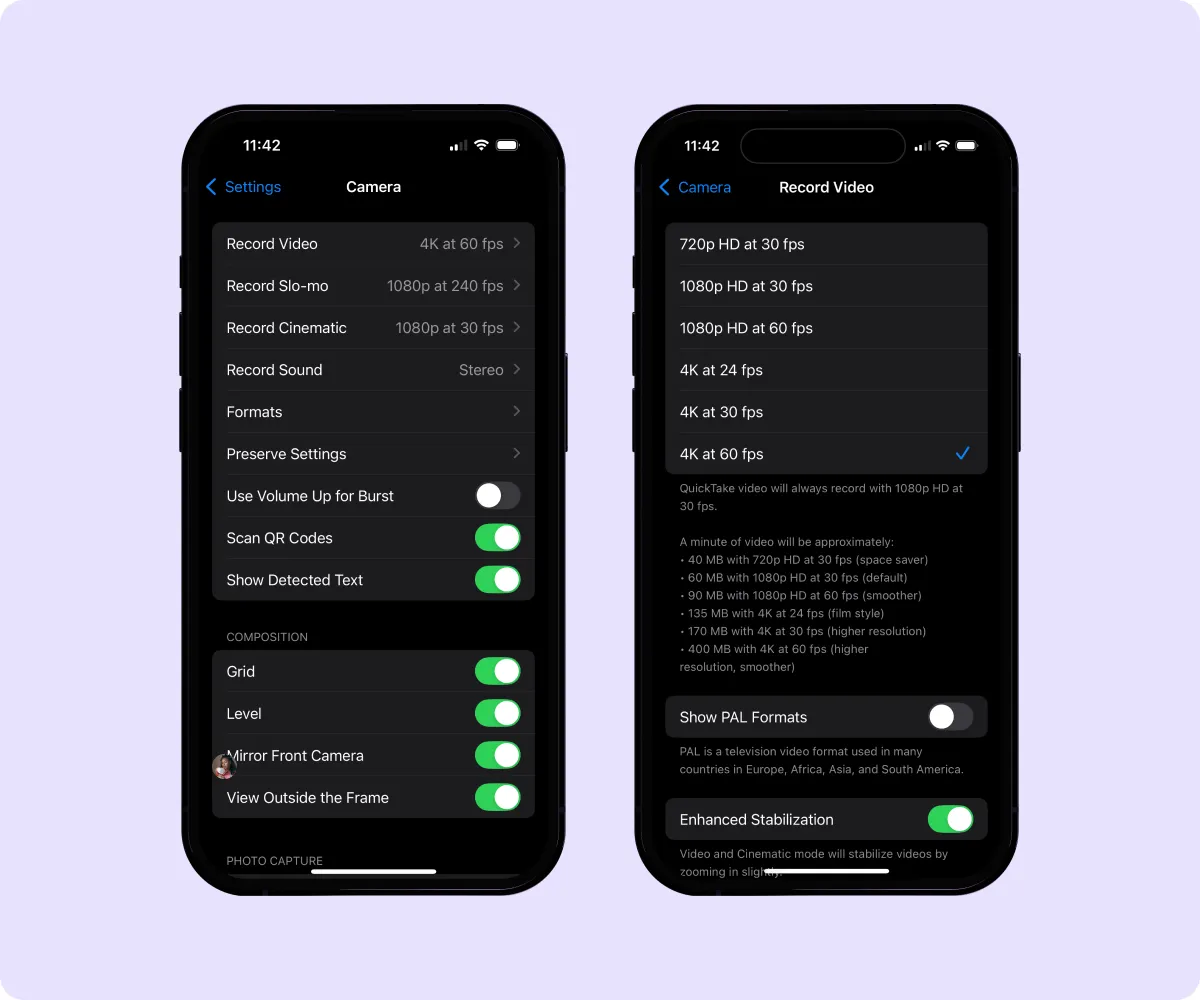
- Lower Resolution/FPS: Open Settings > Camera > Record Video. Choose a lower resolution like 720p HD at 30fps instead of 4K at 60fps.
- Enable "High Efficiency" (HEVC): In Settings > Camera > Formats, select High Efficiency. This uses the H.265 codec, creating significantly smaller files than H.264.
Compress Existing Videos Using Photos App (Simple)
For videos already in your Photos library:
- Open the Photos app and select the video.
- Tap Edit in the top right corner.
- Tap the Crop icon (Adjust may appear).
- Tap the Aspect Ratio icon (overlapping rectangles).
- Choose any preset ratio different from the original (e.g., Square or 9:16). Pinch to zoom the video to fill the frame, losing peripheral areas but drastically reducing file size.
- Tap Done and select Save as New Clip. The compressed version saves alongside the original.
Use a Dedicated Compression App (Easy & Versatile)
Install a reputable video compressor app from the App Store (search "video compressor"). Key steps:
- Select video from Photos library.
- Choose a target resolution (e.g., 720p).
- Select a lower bitrate or quality setting (~50-70% often suffices).
- Optionally, reduce FPS if the source is high.
- Initiate compression. Save the new file.
Key Considerations:
- Balance Size & Quality: Lower settings significantly reduce size but compromise quality. Prioritize based on need.
- HEVC Efficiency: Use HEVC where possible; it maintains quality at smaller sizes vs. older codecs.
- Share Directly: When using the Mail or Messages apps, iOS automatically offers compression options before sending large videos.